The Data Dump Generator is a sampled based tool for Ableton 10, Logic, Cubase, Fruity Loops and any DAW supporting 64 Bit VST3 or AU Plug In. Create glitched out noises, rhythms & loops using the following parameters:
MIDI Trigger> The default Midi note for triggering samples with the Data Dump Generator is C3. You can sequence the Data Dump Generator like a normal sampler player in your DAW. We recommend initially triggering / sequencing just the C3 trigger and utilising the Data Dumps features set out below to get to grips with the functionality & scope of the Data Dump Generator:
Sample Load> Load samples in WAV or AIFF format onto the Data Dump Generator via any ‘Sample Folder’ (not individual files). To add more samples simply continue to load more folders to the existing data dump. Official sample banks contain 100 royalty free samples which are equally spread over the Cue Point control and are available to purchase from: http://datadump.bandcamp.com/
Sample Clear> Clear all samples to start building your bank again from scratch J
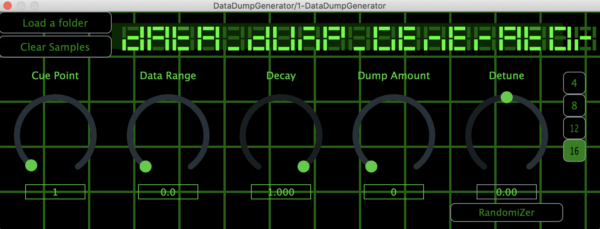
Cue Point> Use this to scroll through the sound bank and select the sample to be triggered. This
will also be the start point for the ‘Data Range’ when activated.
Data Range & Data Rate> Use in unison to randomly flick through the samples. Data Range> Controls the number of samples available for random triggering.
Data Rate> Controls the speed that the samples change. Data Rate is only effective when Data Range is engaged. With both Range & Rate at high settings sounds will change rapidly with a lot of variation. Changing the Cue Point while Range & Rate are active helps explore different zones of the sound bank, enabling you to “zoom in” and isolate specific zones by reducing/changing the Data Range.
Dump Amount> Controls how often samples are let through when triggered. At the highest setting the Data Dump will constantly produce noises when triggered, the middle setting will only produce sounds 50% of the time it’s triggered and at 0 it won’t produce any sound when triggered.
Decay> Controls the time that it takes for the sound to fade. Detune> Controls the pitch of the sample.
Randomizer> When activating the Randomizer the sample will play back at a random pitch. Create random loops by clicking the number buttons [4,8,12 & 16 note loops]. When paired with the Dump Amount control you can create some interesting melody x rhythm patterns.
Installation Help>
The ‘Company Name’ for the VST will appear as Unknown To The Unknown.
Windows 👉 How to Install a VST3 Plug In for Windows
Windows & Ableton👉 https://help.ableton.com/hc/en-us/articles/209071729-Using-VST-plug-ins-on-Windows
Ableton & Plug Ins 👉 help.ableton.com/hc/en-us/articles/209068929-Using-AU-and-VST-plug-ins-on-Mac
Installing An AU Plug-in In Logic Pro👉 https://www.youtube.com/watch?v=DUU3XVXGa9E
How to Install VST3 FL Studios 👉 www.youtube.com/watch?v=NduWKgJdYbk